Wilmington Grill Assembly Instructions
Well, you went and did it, you bought a North Carolina made, Stainless Steel, Wilmington Grill. But now you have to put it together, well, here are the complete instructions for you.

WHAT YOU WILL NEED:
- Straight Screw Driver
- Box Cutter / Knife
- A Good Set Of Pliers
- Socket Wrench With 7/16″ Socket
- 7/16″ Wrench
- 7/8″ Wrench
- A Helper
WARNING! Before you proceed! Please know, putting together this grill is going to take about 2 hours, if you don’t keep breaking away to bandage yourself. If you are not the most patient person, you need to know this. This grill is an investment and is built to last a lifetime. So, before you blow your top, here are some soothing thoughts to keep in mind:
- This is the last grill I have to put together
- When I’m done, I will know my grill inside and out
- What a great excuse to use all those tools I keep buying and not needing
- Steaks are going to taste FABULOUS tonight
- It’s just a small scratch – it will heal to be a proper grill war wound
- Hey, I could be weed eating
- ♬ The leg bolts connected to the shelf bolt ♬
- If Girl With Grill can do it – so can I!!!!
GET READY, GET SET . . .

You will need another person’s help three times in the assembly of the grill, the first is to manhandle the grill box in place. This is a two person lift job. The grill is packaged pretty well and can take a little abuse, but it’s 150 lbs. So get your husband/wife/oldest adult size child/friendly neighbor/significant other to help position your grill on your deck/patio/pool side/yard/front of the garage close to its final home with some space around to work. It’s also helpful to have a table top near by. Tell your helper friend thank you and to please wait around, you will need their help again in just a few minutes.
MY, WHAT A BIG (HEAVY) BOX YOU HAVE

Now open the box up. Here’s where you can use that flat edge screw driver, it’s great for popping the staples off the top of the box. You will see two red beer cozies, the LP tank tray and the instruction manual. Take these out and put to the side. When you lift off the LP tank tray and the instructions, you will see the stainless steel cooking grates. Lift this out and place way to the side, you wont need this to the very end.

Next up, you will see four legs, two on each side and the top of your new grill poking out of more cardboard. There’s a lot of cardboard and more to come, make sure to recycle! Take the legs out and put to the side.
GETTING TO THE HEART OF THE BOX


Now we can cut the main box open.
The grill head is doubled cardboarded for protection. Fold back one layer of the cardboard onto the grill head and using the box cutter or knife, cut the corner of the box from bottom to top. Repeat for all four corners, and voila, the box is open and your grill head is shinning in all its glory.
YOU HAVE A FRIEND IN ME

Now’s the second time for help. Have your helper stand behind the grill and open the lid while bracing the grill head against their legs to keep it from tipping backwards. Don’t worry, it’s not heavy nor hard to do, it just really helps to have someone brace it. Inside the grill head is, wait for it, another box! Take this box out, place it on the table you have near by and have your helper carefully close the grill head back.
Now, thank your helper, tell them how much you appreciate them, and send them on their way letting them know you will need their help one more time in a little while. They have time to start mowing, but I wouldn’t let them leave to go shopping.

Oh, look at those burners!
Don’t worry, you’ll be using them soon!
TREASURE CHEST OF GOODIES
Open up the box you just removed. You will see lots and lots of goodies inside.

Here’s everything in the box.

And here is everything (minus the flame inhibitor tray) spread out on my work table.

And here is the flame inhibitor tray.
Put this to the side – way to the side. You will not need it till the last steps of the grill assembly.

It’s good to open the nut and bolt bag and pour them all into the drip pail.
You should go ahead and fish out 4 wheel washers and 2 cotter pins, you will use these soon.
Please Note: WG knows you are putting your new grill together outside, they know you will drop a nut, kick a bolt, flick a washer and not be able to dig them out from under the azalea bush. Don’t worry – they’re plenty! You will have some left over when you are done. If not, you shouldn’t have been playing bolt football with your child.

BOLT
Here is what a bolt looks like. When I say bolt – this is what I mean. These are also know as carriage bolts – notice the square bit of metal right below the bolt head before the screw starts, this fits in the square holes in your grill for a snug fit. Use washers with these bolts.

HEX BOLT
Here is what a hex bolt looks like. These are used for the lid support, connecting tool holders and other things. You do not need to use a washer with these hex bolts. It is harder to tighten these, you have to use two wrenches, one to hold the nut in place while the other tightens the bolt head.
CUTE LITTEL STUBBY LEGS
NEED: LP tank tray, 2 Legs (shorter legs) 4 bolts, 4 washers, and 4 nuts

First we will start working with the LP tank tray and two grill legs. Remember, you put the LP tank tray aside when we first opened up the main box. Place the tray upside down with the UL sticker away from you. Yes, that’s upside down and away, you wont be able to see the sticker. Situate they tray on the corner of the table, you are about to attach the legs, this will make it easier. Now get the legs. Two legs are shorter than the other two, we will use these first. These legs are shorter because they are the legs for the wheels. Take one of the shorter legs, it doesn’t matter which one, as long as it’s one of the shorter ones. Turn the leg upside down and bolt it to the LP tank tray corner, the one furthest away from you on the right side of the upside down LP tank tray.

Put the bolt through from the outside in, put on a washer and then a bolt – HAND TIGHTEN, do not crank down on it, we’ll do that later. Add the second bolt to the leg, then do the other leg – front corner on right.
A GOOD SET OF WHEELS
NEED: Axle, 2 Wheels Washers, 1 Cotter Pin, 1 Wheel

We’re ready to start working on the wheels. Take the axle, put a cotter pin through the hole on one end and with a pair of pliers, bend both sides of the pin back.

Next, slide one washer down the axle to rest on the carter pin, slide one wheel down the axle on top of the washer.
You may have to wiggle the wheel to get it to go down. then, another wheel washer.

Now, thread the axle, non wheel end, through the two holes in the legs you have attached to the LP tank shelf. These holes are below the bolts you attached.
NOTE: If you are assembling a Classic Grill, one without a front panel, you can place on the second wheel: washer, wheel, washer, cotter pin and bend. If you are assembling a grill WITH a front panel DO NOT put on the other wheel – not yet.
DO THOSE LEGS GO ALL THE WAY UP
NEED: 4 bolts, 4 washers, 4 nuts

Notice Only One Wheel
Now you can attach the other two legs. These are the longer legs. You will need to move the cart away fron the table to finish up with the fourth leg.

Take a notice of the bottom of these longer legs while you have them upside down – see that cut out, you can use this to lag bolt your grill down to your deck when you are all done if you wish. That way, that grill aint going nowhere!

Turn your grill cart over. Wheel on the left back corner as you look at it.
You starting to see it now? You are looking at the front of the grill cart. Yes, you are missing a wheel and yes the cart is a little wobbly – it’s all good, it won’t be that way too much longer.
NO SHIRT, NO SHOES, NO PROBLEM
In other words, if you don’t have a front panel to install, go ahead and skip this step
NEED: Front Panel, 2 bolts, 2 washers, 2 nuts
Personal Note: This is where I got the first of three boo boos. Stainless steel is sharp – it will bite you, please be careful.
Your front panel should have come with another bag of bolts, you can go ahead and add these to your pail for extras.

Front of Cart
Place the cart on its side, wheel down with the legs out to the left. The axle without the wheel should be poking out toward you. The side of the cart without the wheel is the front of the cart and is where you will be installing the front panel.
Your front panel has two cut outs at the bottom of the panel. One of these will fit over the wheel axle. On the wheel cart, remove the two front leg bolts that hold the legs to the LP tank trey – I told you not to tighten any bolts!

Back of Cart
Making sure that the Front of the Front Panel is facing out, slip the front panel between the two front legs and the LP tank tray with the cut out on the panel fitting over the axle.

I use my shoe under the axle on the outside to hold the cart up a little to make this easer.

Back of Cart
Once you wiggle the front panel in, replace the two bolts you removed through the leg/panel/shelf.

Then attach two bolts, washers and nuts through the front legs and panel – about half way up the panel.
NOW YOU CAN DO A WHEELIE
NEED: Second Wheel, 2 Wheel Washers, Cotter Pin

Now, finally, you can install the second wheel. Slide a washer over the axel, slide on the wheel and then another washer. Really push it in there, to get to the cotter pin in the hole in the axle, it is a tight fit. Slide the second cotter pin in and bend the two sides back. This is a little hard to do, make sure you have a good set of pliers!

Turn it over and what do you got? A grill cart base!!
NOTE: To make putting the second wheel on easier, you can turn the cart upside down on the table – but be careful, those stainless steel legs can mar some tables
BRACING FOR THE FUTURE
NEED: Leg Cross Brace, 2 Bolts, 2 Washers, 2 Nuts


Add the support brace to the two legs with wheels. The brace goes on the inside of the legs.
Remember to only hand tighten the nuts, nuting too tight yet!
ALL I NEED IS A LITTLE HELP FROM MY FRIENDS
NEED: Lid Support, 4 hex bolts, 4 nuts
Now is the time to get your helper back, you will need their help on the next two steps. The first step is easy and may lull them into a false since of security. The second one is work, and you will repay them with food – tell them to remember the wonderfully grill food coming their way soon!


You are about to install the hood support on the back of the grill head.
Have your helper hold the grill head mostly open while you install the support with the 4 hex bolts going in from the outside of the grill with the nut being screwed on the inside of the grill.
NOTE: The hex bolts do not need washers
COME ON NOW! LIFT! YOU CAN DO IT!
NEED: 16 bolts, 16 washers, 16 nuts
We are now about to put the grill head onto the cart. If, while putting on the lid support, you had an argument with your husband/wife/adult size child/neighbor/significant other helper and they are shooting you evil glances, now is not the time to do this next step, it may just make things worse and is just not worth it. Take a breather, and come back. If you are on good terms, great! Go for it! It doesn’t take long, just a bit of finagling.
Here is a quick video showing how to lift and position your grill head. I would suggest you watch it with your helper friend before you lift – sometimes it really helps to have a visual!
The video stars my buddies, Shane and Bryan putting together another Wilmington Grill.

First, move your grill cart directly in front of the grill head. Now that all the parts are out the grill head, it’s not too heavy, just a bit bulky.
Both of you need 8 bolts, 8 washers and 8 nuts, have them ready, put them in your pocket, when you need them you will need them fast.

Stand on one side of the grill head with your helper standing on the other side, both facing each other. With the lid open, use the hand furtherest from the grill cart to grasp the grill head inside the grill toward the back. Have the other hand cross your body and hold the grill lid open.
Both lift at the same time.

Maneuver the grill head inside the four legs. Once it starts to line up, use the bolts you have near by/in your pocket to bolt the legs to the grill – bolts on the outside, washer and nuts on the inside.
I would suggest one of you work on putting the bolts in the back leg while the other works on the the opposite front leg.

HAND TIGHTEN
Trust me – don’t crank down on these yet.
WIGGLE WIGGLE WIGGLE
NEED: 3 hex bolts, 3 washers

If you have a front panel, you need to get up under the grill head and attach the top of the front panel to the bottom of the grill head, else, it will be wiggling in the wind!
You did it, that’s about the hardest part.
Thank your helper profusely, and send them on their way. You don’t want to see them until the food is on.
LOOKIT MA – IT’S A GRILL!
NEED: Grill Handle, 4 hex bolts, 4 nuts

Take a step back, take a breather and admire your handy work. It’s really starting to come together, not much left to do now.
Oh, the fun part, peel that plastic wrap off!


Now, open up the hood and install the handle with the 4 hex bolts and nuts (nuts on the inside).
Remember, the hex bolts do not need washers.
GO AHEAD AND HIT ME, I’M UNARMED
NEED: 2 Side Shelves, 4 shelf brackets, 8 bolts, 8 washers, 8 nuts
Your grill does look a little funny without shelves, like it doesn’t have any arms. Let’s fix that.

Go back to your table to work on the shelves, it will be much easier. Don’t worry, your grill anit going nowhere. Now you get to pull even more plastic. Remove all the plastic from the two shelves and four shelf supports.
WARNING: If you have small children near by and watching, they are going to want to help. I mean, it does look kindof fun pulling back plastic and you may think this would be a great way to let them “help” you build your grill, but please reconsider. The second of my three boo boos came while pulling plastic, some of the edges, especially under the shelfs can be quite sharp.


Place one shelf upside down on the table with the back hanging off the table just a little. Place two of the shelf supports on top if it. Have the flat edges of the supports facing out toward the sides. Attach with 4 of the bolts, 4 washers and 4 nuts. Make sure the bolts that go on the edge of the shelf have the bolt head sticking out while the bolts you install on the back of the shelf where it’s hanging over the table have the bolt head facing the ground. Repeat these steps for the second shelf.
GET A HANDLE ON YOURSELF
NEED: Side Shelf Handle, 4 hex bolts, 4 nuts

One shelf gets the shelf handle, pick one, it doesn’t matter which one. Place the shelf upside down on the table with the finished edge toward you. Situate the handle’s arms on the outside of the shelf support, lining up the holes. Place one hex bolt with nut on through the back hole on both sides. Now, push the hand in place between the opening in the front corner edge of the the shelf. Now add the other two hex bolts with nuts.
Watch my buddy Shane do it in this video. He already has one hex bolt in the handle support arm on the right.
After he pushes the handle through, he adds the other two hex bolts:
Tighten up all the bolts on the shelves. Yes, I said tighten – it’s best to use a socket wrench, makes it much easer. The second wrench is needed when you tighten the hex bolts. You won’t need the second wrench to tighten the regular bots.
ONLY tighten the two shelves, don’t wander over to the grill and start working on it – not yet.
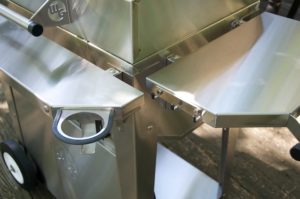
COMES WITH YOUR CHOICE OF SIDES
NEED: 8 hex bolts, 8 nuts, two assembled shelves

Now install the shelves onto the grill. The shelf with the handle goes opposite of the side with the wheels. Use 4 hex bolts and 4 nuts on each side. Do not tighten these up yet.
FRONT CURB APPEAL
NEED: Front Shelf, Tool Holder, Bottle Holder, 4 bolts, 4 hex bolts, 4 washers, 8 nuts
A word about the front shelf. The front shelf is great – I love it. It’s really convenient. However, I have been accused of being an amazon. I’m tall, taller than most women, and right up there with most the men I know. I have the wing span of a pterodactyl. If you are shorter, that’s great! I’m betting your jeans aren’t always high waters, you fit on planes better and the standard kitchen counter top is just right. However, you may want to consider not installing the front shelf. The front shelf projects out from the grill 7.5 inches. When the grill lid is open, it quite a reach over a hot surface to reach the handle to close it. Go over to your grill and try it out now. Open up the lid, let go, now reach to close it. Remember, when grillin, that’s going to be hot in there. You can stand to the side to close it, and that might work great for you. I just wanted to make you aware. The grill will function perfectly fine without the front shelf if you choose to leave it off.
So, you’re going to install the front shelf – here we go.
The front shelf comes with another bag of bolts, just add them to your pile in the bucket.
Please Note: My pictures are WRONG! So sorry, see I did it first for you – I’m helping you out. I’ll explain in a few.


Place your front shelf upside down on your table. Install your tool holder with 2 hex bolts and 2 nuts on one of the angle sides of the front shelf. Doesn’t matter which side, depends on where you want your tools and where you want your beer/soda/bottle/wine glass.
Please remember that the shelf is upside down, make sure your tool and bottle holder is also upside down when installing.
My picture does not show this, I installed them later after the shelf was on the grill and let me tell you, that was a mistake. Install your bottle holder on the other side. Go ahead and tighten up your tool holder and bottle holder.
Now install the front shelf brackets using 4 bolts, 4 washers and 4 nuts. Have the two bolts on the front edge with the bolt head facing out and the two bolts heads on the back edge facing the ground. Tighten up these four bolts.
LETS GET THAT SHELF ON
NEED: 2 hex bolts, 2 nuts


Leave the front shelf where it is and go back to your grill. You have to remove two bolts to install the shelf – I TOLD you not to tighten up the grill yet!
Looking at the grill, remove the two top bolts holding the grill head to the cart and keep them handy.
Place the front shelf in place, lining up the two top holes you just opened up to the two top holes on the front shelf support bracket and put back in those bolts you just removed.
Now, put in the two hex bolts on the lower part of the front shelf support.

Well, look at that, a fully realized grill, but wait, almost there.
 Oh! An Extra! Your grill came with a tool holder. If you got a front shelf, you got second tool holder along with the bottle holder. I installed one tool holder on the left side of my front shelf and added the extra on the right side shelf. I can’t ever have too many tool holders!
IT’S TIGHTENING TIME!
NEED: Socket Wrench with 7/16″ Socket, 7/16″ Wrench
Personal Note: This is where I got my third and worse boo boo. Do not get over anxious with the socket wretch, your hand could slip off and get sliced up.


Out Side of Grill
DO NOT tighten up the peep hole.
What’s the peep hole? The peep hole is where you can peep in on the burner. It was already installed before you ever got your grill, just make sure not to tighten them up, there’s one on each side. They have two bolts, one on top of the other.


To tighten up the bottom of the grill cart, it’s best to place it grill on its side. Don’t worry, it’s a big boy, you wont hurt it.
Make sure you get all the bolts tighten up well – nows the time. Don’t forget the bolts that are holding your front panel in place under the grill head.
After you have tighten up all your bolts and still have the grill on its side, you should go ahead and check the gas connections, make sure they are tight. The gas line is located up under the grill head, there are four connections to check. Watch my buddy Shane do it in this video.
INHIBITOR? I DON’T EVEN KNOW HER!
NEED: Flame Inhibitor Tray, Aluminum Tube with Valve

Time for the inhibitor tray to be installed. Simply place into the grill, its got four tabs that stick out to rest on four little stick out shelfs inside the grill. Make sure the hole goes on the right.

Next you will thread the valve rod into the inhibitor tray. This is where the water and juices and grime and gook can flow onto the inhibitor tray and down the drain to the pail.

Thread the pipe up from the bottom of the grill, lining it up with the hole in the inhibitor tray. Trying standing up and looking down into the hole while threading the pipe up to help line it up.
IT’S GETTING HOT IN HERE
NEED: Thermometer, 7/8″ Wrench


Let’s put in the thermometer. My it’s big, isn’t it.
DO NOT hand thread the thermometer in place. While trying to hand tighten it, you could break it. Instead, use your big 7/8″ wrench.
Do NOT over tighten.
THE FINAL TOUCHES
NEED: Cooking Grid, Bun Warmer, Grill Scraper, Pail, LP Tank


Open up the lid and put your cooking grid in place and add your bum warmer.


Now, place your LP tank in its hole on the LP tank tray and connect up your gas.
Yes, I have a well loved tank – its been with me a while, but it’s good and it’s safe and the front cover covers it up!

Take out the left over nuts and bolts from your pail. Yes, you will have left overs! Don’t worry, you didn’t miss anything. Hang your pail from the valve under the tube leading up to the flame inhibitor tray.
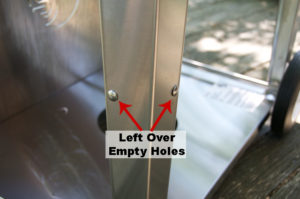 Here’s a tip: It’s good to save those left over nuts bolts and washers, just in case. There are a few empty holes left open on the legs, you can put some of the left over bolts here, that way they are always with the grill.
YOU’RE GOOD TO GO!
HAPPY GRILLING TO YOU!
HAPPY GRILLING TO YOU!